


In previous posts, I’ve covered how Evernote helps to get things done more efficiently and with ease. In this post, I’ll focus on using checklists in Evernote to help you become an even more productive lawyer.
First, it’s important to point out there is a real and meaningful distinction between checklists and tasks in Evernote. Checklists are designed to serve as reminders of things that you need to do, but not things that serve as single-action items, which Evernote considers a task.
Checklists come in handy for activities that take several steps to complete, or for a portion of a project that requires lists. Here are some examples of things I use them for:
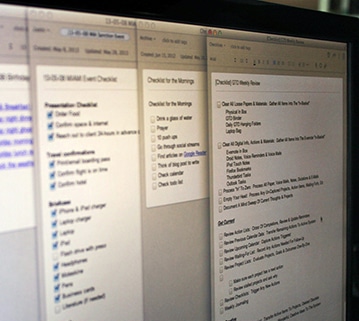
- Morning routine
- Getting Things Done weekly review
- Business and personal travel
- Creating a client presentation
- Drafting a blog post
As a lawyer, master checklists can be used to remind you of the steps in routine activities such as:
- Drafting a motion or brief
- Replying to a motion or brief
- Going to court to argue a motion or brief
- Prepping a witness for deposition
- Opening a new client file
Adding these kinds of checklists to Evernote can really help you step up your productivity. You will have created a repeatable process that does not require any guessing whenever you need to, say, open a new client file.
Create a Notebook for Master Checklists
One way to get the most out of your checklists in Evernote is to create a notebook called “Master Checklists.” Once you create this notebook, you will be able to right-click on any one of the master checklists you place in it, select “Copy to Notebook,” and place the copy into another notebook.
For example, let’s say you set up a master checklist called “Opening a New Client File.” This checklist could contain the typical steps to follow when taking on a new matter, including running a conflicts check, receiving your retainer, doing an initial investigation, writing a memo to the file, thanking the client and creating a client folder.
Now let’s say you have a prospective client from the ABC Corporation looking for your assistance. The first thing you want to do is create a new notebook called “ABC Corp.” Next, go to your Master Checklist notebook and copy and paste your “Opening a New Client File” checklist into your ABC Corp notebook, and you can begin customizing it for ABC Corp.
Link Your Evernote Notes to Your Checklist
Now, let’s step it up a notch. Say your Evernote ABC Corp notebook contains your initial research, tagged by issue of law, plus the results of the conflicts check and other reference-related materials—all tagged accordingly. Depending on your comfort level with storing legal work product in Evernote, you may have added it as well. (Read more about Evernote for Business and its security features as well as Evernote’s Three Laws of Data Protection.)
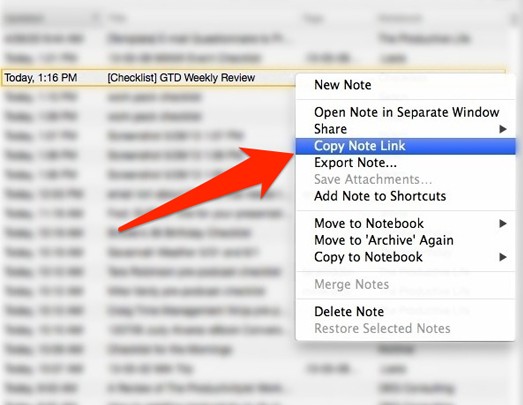
Now we’re going to connect your reference-related materials and the checklist for “Opening a New Client File” with the power of Evernote’s copy note links function. Note links are, basically, internal Evernote hyperlinks for each note you store inside Evernote, so when you add a note link to a new note it functions just like a webpage!
The idea is to make the items on your ABC Corp checklist hyperlink to a note within the ABC Corp notebook. This will allow you to get to the exact note you need quickly, without having to search through an increasingly long list of notes accumulating in the notebook.
For example, let’s say you want to see the results of the conflicts check straight from your checklist. To do this, you need to create a hyperlink that takes you from the checklist directly to your conflicts result note:
- Right-click on the “Conflicts Results” note and select “Copy Note Link.”
- Open the checklist and highlight the “Conflicts Results” task. Now right-click, select Link, then Add, and then paste the copied link into the pop-up menu.
- The note link will appear in your checklist.
This is an incredibly useful way of accessing important information quickly and efficiently.
One More Evernote Tip
If you sort your notes in Evernote by date order, but still want the checklist to appear first in a notebook, manually change the note’s date to a date far in the future, say the year 2020. Simply click on the “i” button in your note on either a PC or a Mac, highlight the year in which the note was updated and change it.
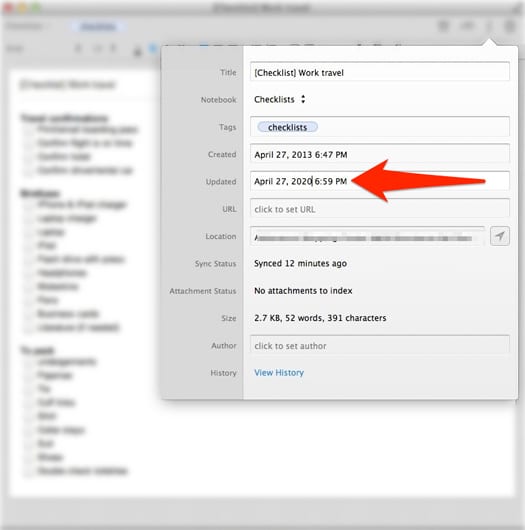
Illustration ©ImageZoo.