


Attorneys spend a lot of valuable time redlining and negotiating contracts. According to a recent poll, 91% of contract negotiators (myself included) use MS Word Track Changes to redline in word.

Table of contents
But how many of us truly know how to use this tool efficiently and effectively? Probably not very many. Because we didn’t receive formal training on how to use Word for redlining contracts. Instead, we learned how to use Word for homework assignments. When it comes to redlining contracts, many of us only use the functions we already know how to use.
There is so much more! Learning how to use Word for redlining contracts will speed up your review times, shorten the negotiation cycle, and make your job less frustrating. For example, here are three workarounds for redlining contracts using MS Word Track Changes. (Note these tips are for PCs and may not work the same on a Mac.)
Workaround No. 1: Unlock a Document With Tracked Changes On
Lock Tracking is an MS Word feature that uses password protection to block other users from turning Track Changes off. The problem with using Lock Tracking is that it blocks other users from using all the Track Changes features, including managing deleted text.
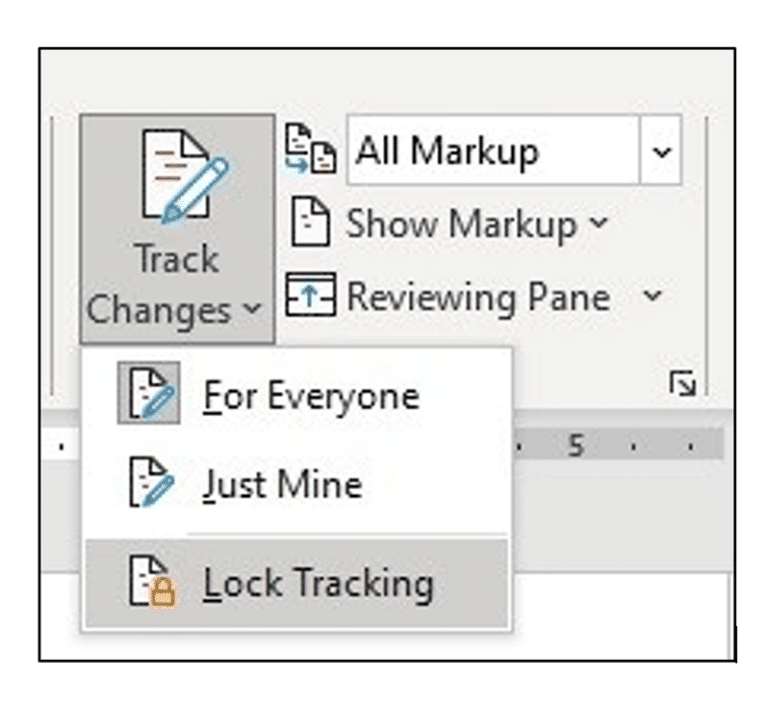
For example, when Lock Tracking is on:
- You can only move forward in the revision process, not backward. That means that if you make an edit and then later want to go back and revise the edit, you won’t be able to. This can result in incorrect redlines.
- You can only propose edits; you can’t Accept or Reject edits. That means you are in a one-way redlining exercise. This can slow down the negotiation process and make managing edited text more difficult.
- You can feel as though your point of view is unwelcome. This can damage the collaborative nature that we should be fostering in commercial contract negotiations.
So while it seems nice in theory to require your counterparty to use Track Changes, using Lock Tracking is not suitable for commercial contract negotiations because it can ultimately delay the negotiation process.
If your goal is to reduce the number of redlines received, then consider improving the terms in your contract template instead of locking the document. If your concern stems from a lack of trust, then run your own redlines using a document comparison tool. (MS Word has one.)
Here’s how to unlock a document with Lock Tracking:
- Save the locked document to your computer.
- Open a new blank document in Word.
- Go to Insert > Object > Select Text from File.
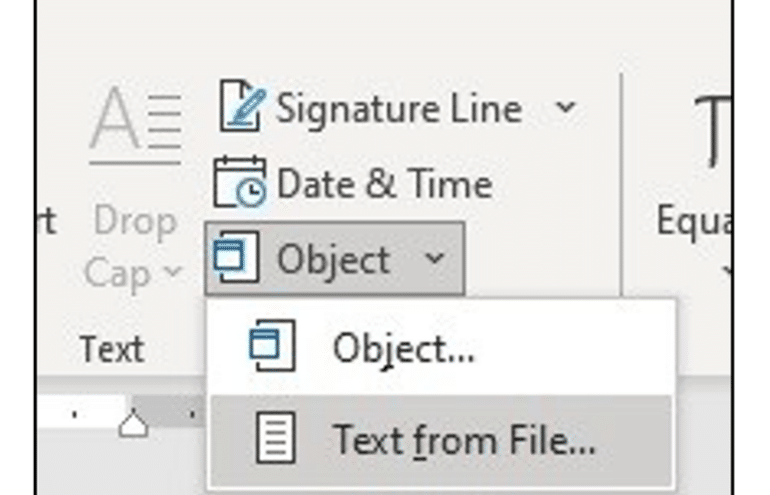
- Navigate to and select the locked file, and click Insert.
And voila! What you get is a new, unlocked Word document reflecting all formatting, redlines and comments from the original document. Be sure to save this under a file name that indicates the change, such as “unlocked version.”
Workaround No. 2: Only Accept Formatting Changes
We’ve all been there. We get to a point where there are so many formatting changes that it has gotten difficult to see through the woods. The presence of so many formatting changes is even disrupting your efforts to fix formatting issues, so hiding them isn’t enough. You need to clear the formatting changes but you’re not ready to clear the redlines or comments.
We usually get to this point when:
- We are preparing the final version for execution, or
- We are managing multiple versions of a long and complex agreement with more than two parties involved.
Here’s how to accept or clear all formatting changes from your contract:
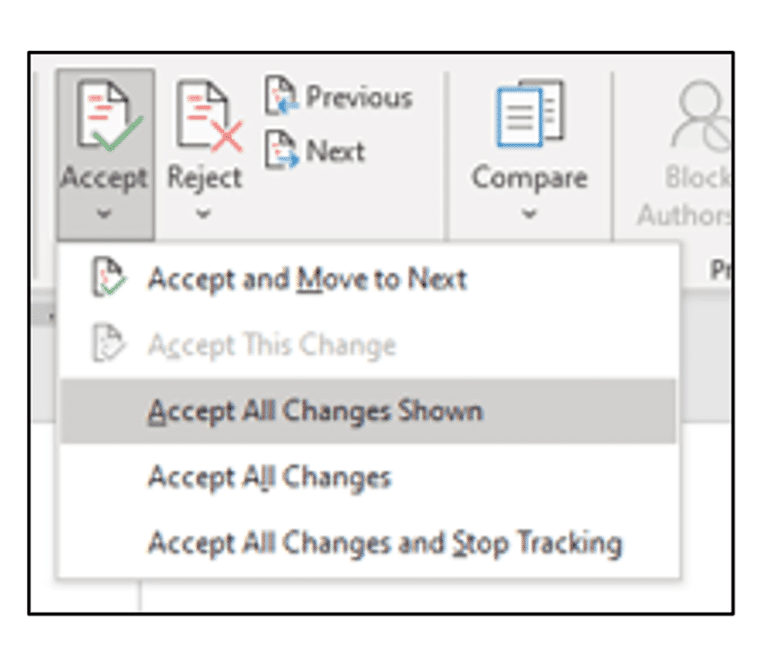
- Go to the Show Markup menu and click on the drop-down arrow.
- Uncheck Comments.
- Uncheck Insertions and Deletions.
- Check Formatting. Now only your formatting changes will appear on the screen.

- Then, click on the Accept drop-down arrow.
- Select Accept All Changes Shown.
If you are preparing the final version for execution, then clearing all formatting changes is a given. But if you are clearing formatting changes midway through the negotiation, be sure that all parties agree before doing so. To do this, you can note the draft as such via email to the parties and within the file name. For example, in the file name, you can add “formatting cleared.”
Workaround No. 3: Remove All Comments With Just One Click
Before sending a contract out for signature, it is important to clean up the draft by clearing all markups and comments from the margins of your word documents so that the final document reflects only the agreed-on contractual terms.
Instead of manually deleting each comment one by one, you can simply click a button that will clear all comments (resolved and unresolved) at the same time.
Here’s how to resolve comments from your contract with just one click:
- Go to the Review tab.
- Select the Delete drop-down menu.
- Click Delete All Comments in Document.
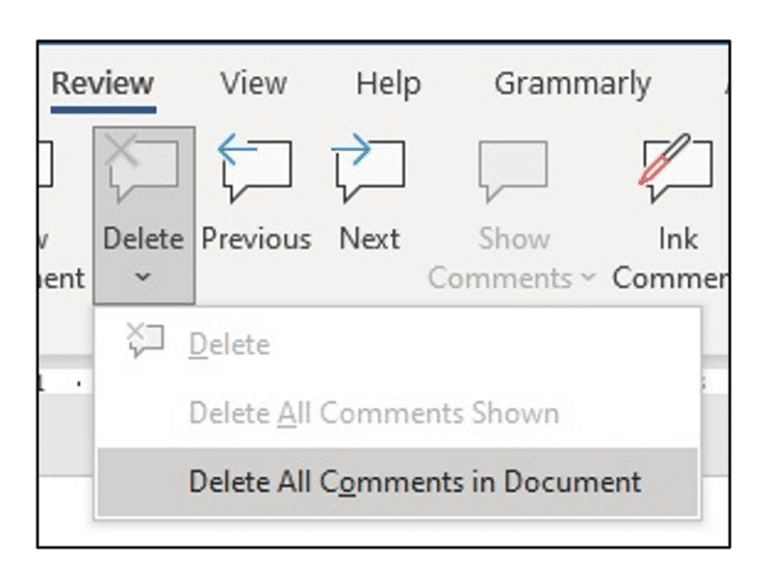
You will instantly have a comment-free contract at your fingertips, ripe for execution.
If you’re interested in learning more about redlining best practices and contracts in general, check out my book “Contract Redlining Etiquette,” subscribe to my weekly newsletter Read Between the Redlines, and check out the Contract Nerds blog. It’s safe to say that I’m a total #contractnerd! Are you?
Things to Remember About How to Redline a Contract in Word

Understanding Redlining in Microsoft Word
Redlining in Microsoft Word is a game changer. It allows you to track changes in a document. Super useful for contract review and negotiation. By turning on Track Changes you can see who made what changes, when and what. It’s all about having a clear record of document changes and authorship so everyone in the contract review process is on the same page.
When you turn on Track Changes in a Word document every insertion, deletion or formatting change is highlighted so you can see what’s been changed. This is very useful for legal teams and contract managers who need to keep a record of contract data and changes. Tracking changes not only speeds up the negotiation process but also helps resolve any disputes that may arise from different versions of the contract.
In short, redlining in Word changes the way we edit documents, making collaboration more efficient and transparent. Whether you’re working on a simple agreement or a complex multi-party contract, knowing how to use Track Changes will supercharge your contract management workflow.
Recap of Workarounds and Best Practices
To get the most out of Track Changes in Microsoft Word, here are some best practices and key takeaways from the workarounds discussed:
- Use the Track Changes feature: Always enable Track Changes before making any edits to a document. This ensures that all modifications are recorded and can be reviewed later.
- Enable Track Changes: Go to the Review tab and click on Track Changes to start tracking your edits. This is the first step in maintaining a clear record of changes.
- Manage tracked changes via the Review tab: Use the Review tab to accept or reject changes, resolve comments, and manage other aspects of the document review process.
- Resolve comments: Address all comments by either resolving them or deleting them once they are no longer needed. This keeps the document clean and focused.
- Customize markup settings: Adjust the appearance of tracked changes to suit your preferences. This can make it easier to distinguish between different types of edits.
- Manually redline documents when necessary: In some cases, you may need to manually redline documents to highlight specific changes or issues.
- Use contract management software: For managing multiple contract versions and tracking changes across various documents, consider using specialized contract management software. This can help streamline the entire contract review and negotiation process.