Too many people manually type a document’s table of contents. A simpler easy-to-update way using Microsoft Word’s Heading Styles.

Watch Attorney at Work and Legal Office Guru’s videos for quick Microsoft Office tips.
Most of us have a love-hate relationship with our work. If we’re lucky, we love most of what we do, most of the time. But some days, the tasks we have to perform can be downright boring, frustrating or annoying. Last month I had one of those days.
We have an unwritten policy that when working on a document prepared outside the firm, a lawyer or assistant should struggle no longer than 20 minutes before sending it along to me. Generally, I can fix whatever is “wrong” in five minutes or so, and then they can get back to work. This time, when one of our legal assistants sent along a rather lengthy draft document she had received, it took three hours to fix. It was a horror show. Every single thing had been done manually, and badly. Manual numbering, centering by using the space bar, unnecessary manual line breaks — and not a Style in sight.
One of the many changes needed was creation of a table of contents. Too often, people make the mistake of typing a table of contents from scratch — a tedious, time-consuming task fraught with the possibility of error. That unneeded effort doubles when the document gets edited, paragraphs move and page numbers change. It doesn’t have to be that way.
Word has the ability to quickly — and accurately — create an easy-to-update table of contents for your document. All you need is a document that’s properly prepared, using Word’s Styles. Then, in just a couple of clicks, Word will automatically pull every heading that has a Heading Style applied to it into a fresh table of contents, with corresponding page numbers.
Create a Table of Contents Based on Your Heading Styles
If you’ve been following along with this series on using Styles, you should have a draft document to play with — one that already has Heading Styles in it. (You can download the document linked here and save it to your desktop.) To create an automated table of contents:
- Open any document containing Heading Styles (or download the document linked above).
- Place your cursor in the area of the document where you wish the table of contents to be located.
- From Word’s Ribbon, choose the References tab.
- In the References tab, click on Table of Contents, and then click either Automatic Table 1, Automatic Table 2 or Custom Table of Contents. (See note below.) Do not choose the Manual Table option.
- The table of contents will appear automatically at the insertion point.
Note: If you use Automatic Table 1 or Table 2, your table of contents will only show entries for Heading Styles 1 through 3 (see below). If you used other Heading Styles in your document, they will not appear in the table of contents. In that case, choose the Custom Table of Contents option.
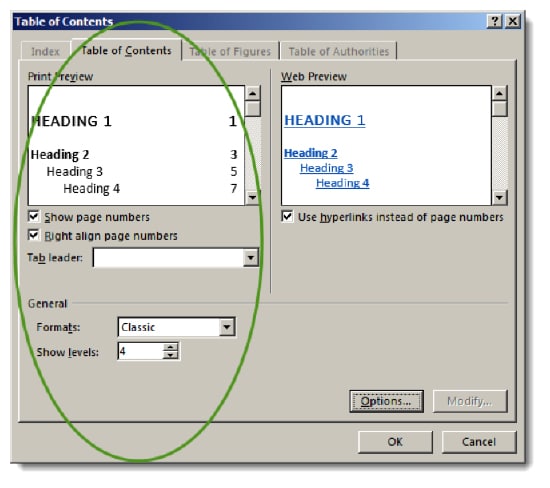
With just these few clicks, your document has an automated table of contents that looks something like this:
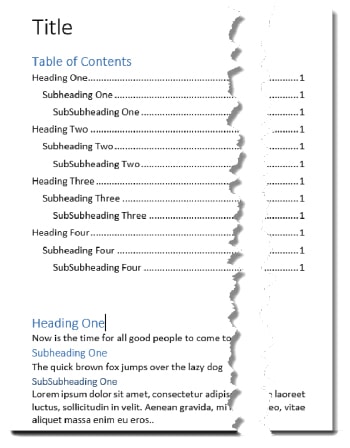
A Quick Primer on Using Word’s Table of Contents
It’s important to understand a few things about Word’s Table of Contents feature.
The Table of Contents is a Word field. If you have Word set to show field codes instead of field values, you’ll need to go to Word’s Options (advanced) and set it to show values. You’ll know it’s set to display field codes if your table of contents ends up looking like this:
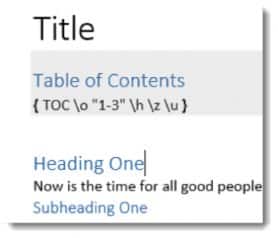
Turn on Field Shading. Fields are easier to find and work with when shading is turned on. Head to Word’s Options, select Advanced and click to turn shading on to “Always.” (Note that the shading on screen will not show up in a printed document.)
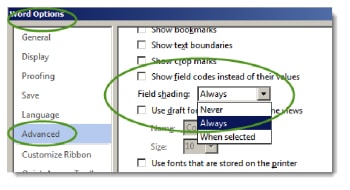
Word Fields are updated with the F9 key. You can update with F9 while the cursor is placed anywhere in the field (i.e, within the shaded area if field shading is turned on). Alternatively, you can click on the Update Table that will appear when you click anywhere within the table of contents. (My habit has been to use Ctrl+A to select the entire document, then F9 to update all fields – I’m just lazy that way.)
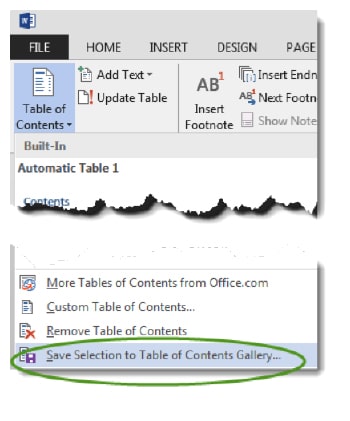
Re-use your customized tables of contents. If you customize a table of contents and want to use the same approach in other documents, you can save it to the Table of Contents Gallery:
- Select the entire customized table of contents in your document.
- Click the References tab.
- Click Table of Contents.
- Click Save Selection to Table of Contents Gallery.
- That choice will now be available in the drop-down list when you want to add a table of contents to future documents.
Bonus Tip: Page Breaks
Most people like to place the table of contents on its own page, so they create manual page breaks (Ctrl+Enter) either before or after inserting their table of contents. To save a step or two, you can insert page breaks and the table of contents at the same time. Customize a table of contents exactly as you wish, and add it to the Table of Contents drop-down list as described above. Then do the following:
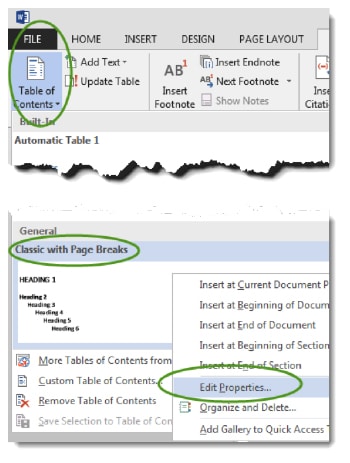
- Right-click on the new entry.
- Click on Edit Properties.
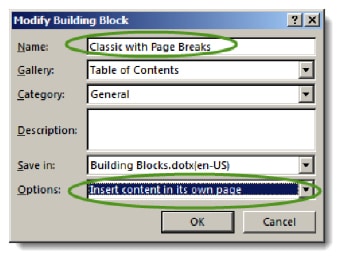
In the Modify Building Block dialog box that appears:
- Name the table of contents, for example, “Classic with Page Breaks.”
- Change Options to: “Insert content in its own page.”
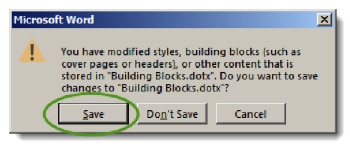
When you exit Word you may see a dialog box similar to the one below. Be sure to click Save so that selection is available the next time you want to use it.
Quicker Access, Easy Updates
If you are regularly using the Table of Contents feature, go ahead and add the Table of Contents Gallery to Word’s Quick Access Toolbar, using the same right-click Edit Properties menu shown above.
You’ll be able to access the Table of Contents Gallery in one click. One more click will insert your customized table of contents on its own page, and a third click will update it, automatically. What could be easier?
Now you can go ahead and edit your document to your heart’s content — and let the Table of Contents feature work for you. It all starts with proper use of Word’s Heading Styles.
Vivian Manning is the IT Manager at Barriston Law LLP in Barrie, Bracebridge and Cookstown, Ontario, and is Attorney at Work’s Power User columnist. Prior to moving into IT, Vivian practiced law at Barriston LLP, primarily in the area of Municipal Land Development, with a total of 17 years in private practice before switching to the IT side of the law office. She currently indulges her love of teaching tech through her blog Small City Law Firm Tech, where she provides “tips of the day.” Follow her on @vivianmanning.
Illustration ©iStockPhoto.com


