In last month’s column, “Stylin’ It in Microsoft Word,” I showed how using Word’s default Styles to format documents can make your life much easier — and urged you to “leave ’em as Microsoft set ’em.” Still, I had a few requests from readers who really would prefer to change the default Styles settings and wanted to know the best way to go about it.
Changing Word’s default Styles is quite easy to do. You can either use what I’ll call the “formal” method or make changes even more quickly using the “easier” method. Once you make the changes you wish to Word’s default Styles, for better or worse, from that point forward Word’s Styles will become your default Styles. Before changing default Styles, though, understand it’s possible your changes won’t translate for others who open your documents.
The Formal Method
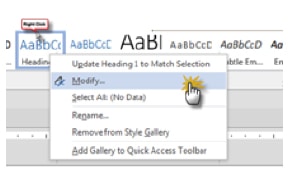
In the Quick Style Gallery section of Word’s Home Ribbon, right-click (control-click for Mac) on the Style you wish to change, let’s say Heading 1, and then click on Modify in the pop-out menu.
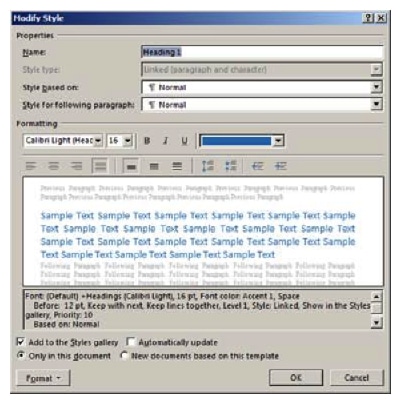
In the Modify Style box (see Figure 2 below), modify the Style by changing whatever formatting settings you wish. If the formatting you want to change isn’t shown in the Modify Style box, click on the Format button in the lower-left corner for more choices.
Make sure the “Only in this document” option is selected if you don’t want to affect your other work. (This should be the default.) If you do wish to make permanent changes — meaning all new documents will adopt your new Style settings — select ‘”New documents based on this template.” Click on OK when you’re satisfied with your modifications.
The Easier Method
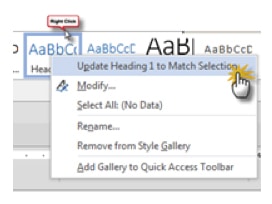
For this faster, easier method, you simply format your document manually, as desired, and use the “Match Selection” option in the Styles Gallery menu.
- First, select the text in your document you wish the about-to-be modified Style to apply to (for example, a headline with the Headline 1 style that’s been changed to a new font).
- Right-click or Control-click on the Style in the Styles Gallery on the Home Ribbon.
- Click on “Update … to Match Selection” — for example, “Update Headline 1 to Match Selection.”
It’s that easy. Once you click on Update, that Style is modified. As with the Formal Method above, select either “Only in this document” or “New document based on this template” and then click on OK.
Important: Always test modifications such as these on a COPY of your document, not a working version. Once you’re happy with the results, you can open up your real work and make the desired changes there. (Still keep a clean copy, just in case — you can never be too careful!)
Alternate Method: Create a New Style Based on Formatted Text
If you prefer to keep Word’s default Styles but also use a few Styles of your own, you can create completely new Styles, too.
- Select your newly formatted text.
- Click on the More button in the Style Gallery on the Home tab, then select “Create a Style.” (Word 2010 users will see “Save Selection as New Style Set” and Mac users will select “Manage” Styles and click the “New Style” button.)
- Type a name for your new Style.
- Click on OK.
- Click on Modify to make further changes to the formatting settings if desired.
- Click on either “Only in this document” or “New document based on this template” to make the Style available in the open document or all future documents.
- Click on OK to create your new Style.
Reverting to Word’s Default Styles
What do you do if you muck it all up and want to get back to Word’s default Styles? Well, it can be done, but the solution is kind of drastic.
All of Word’s default template settings reside in a file on your computer named Normal.dotm. This file determines how every new Word document is styled by default when opened. You have to find this file on your computer and rename it. (Word must be closed when you do this.) Note that I didn’t say delete the file — if you delete it, you may not be able to retrieve it, and you might very well want to do so.
Once you find that file, right-click on it and Rename (just change the .dotm extension to something else and click through the warning). When you next open Word, all the default program settings will be restored.
WARNING: Any and all customizations you have made to Word will be wiped out — macros, new Styles, etc. All customizations. It’ll look like a fresh install of Word. If you find that you’re missing crucial stuff that you can’t live without, quit out of Word, then find and delete your new Normal.dotm file, locate your old, renamed file, and rename it once again — back to Normal.dotm. Reopen Word and your customizations should be restored. It’s an unsatisfactory all-or-nothing solution.
If anyone knows of a better way (other than tediously and manually restoring the Styles settings one at a time), I’m all ears and will be eternally grateful!
Illustration ©iStockPhoto.com


