


Using outlook quick steps feature allows you to launch a workflow of steps with a single button click. Here’s how to set it up.

Most attorneys agree: Keeping up with email is a full-time job in and of itself. Processing email faster is the key to getting out of your inbox and back to work. Quick Steps, available in Outlook’s Windows desktop application, can save you time when it comes to routine tasks. In the new Outlook, Quick Steps can be particularly useful, though some users have reported issues with missing Quick Steps from the old Outlook and difficulties in creating new ones. Here’s how to set up workflows with Quick Steps, adapted from Affinity Consulting Group’s “Microsoft Outlook for Legal Professionals.”
Introduction to Quick Steps
The Quick Steps feature allows you to launch a workflow of steps with a single button click. With Quick Steps, you can automate:
- Moving emails to folders
- Copying emails to folders
- Deleting emails (moving them to your deleted items folder)
- Permanently deleting emails (skipping the deleted items folder)
- Marking emails as read or unread
- Setting the importance level of an email
- Applying categories to emails
- Clearing categories from emails
- Flagging emails
- Clearing flags from emails
- Marking emails as message complete
- Creating tasks based on emails
- Responding to emails with new messages, forwards, replies, reply alls, or meetings
- Creating meetings and appointments based on emails
- Setting conversations to always be moved or ignored
You can also create a custom Quick Step tailored to your specific needs, enhancing your productivity by automating multiple actions with a single click.
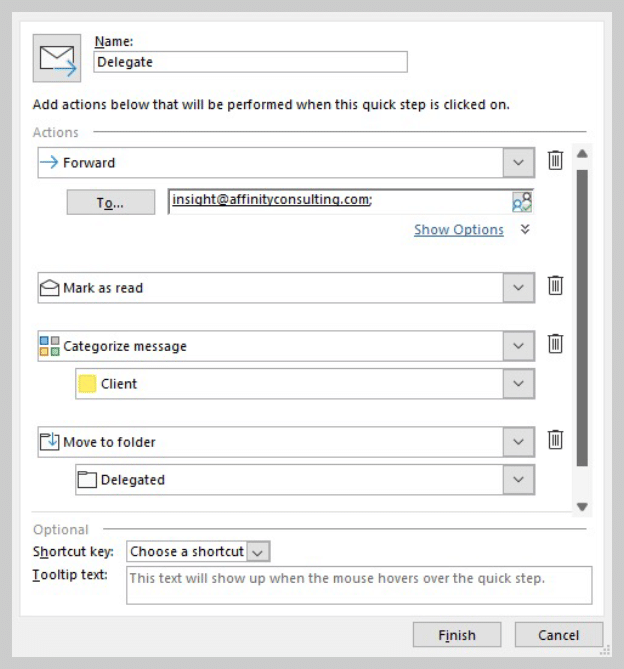
While creating a Quick Step that accomplishes any one of those tasks can be helpful, the real power comes from building workflows that incorporate multiple steps. For example, if you frequently delegate work to the same person, you can build a quick step that forwards the email, marks the email as read, applies the client category, and moves the email to a delegated items folder.
What are Quick Steps?
Quick Steps are a powerful feature in Microsoft Outlook designed to automate repetitive tasks and enhance your productivity. Essentially, they are a series of predefined actions that you can execute on an email message with just a single click. Whether you need to move an email to a specific folder, create a task, or set up a meeting, Quick Steps can be customized to perform these actions seamlessly. By streamlining your email management, Quick Steps help you save valuable time and reduce the effort spent on routine tasks.
Creating a New Quick Step
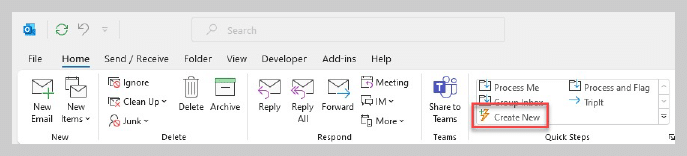
Quick Steps are found on the home tab in the Quick Steps group. Quick Steps are not available for calendars, tasks, people, notes or folders. Here’s how to create a new Quick Step:
- Click on the Create New button in the Quick Step gallery.
- Give your Quick Step a concise name that is meaningful to you. When you apply your Quick Step, you’ll identify it by its name.
- Then, select the first action in your workflow.
- Some actions will need additional information, such as the folder to move the email to or the Category to apply.
- After setting up your first action, click on the box to add additional actions to stack each step of your workflow together. You can also click on ‘additional options’ to further customize your Quick Step.
- Consider adding a shortcut key to activate your Quick Step faster.
Using Quick Steps
Once you set up your Quick Step, it’s time to use it. Either click on the name of the Quick Step in the Quick Step gallery or use the keyboard shortcut you assigned when creating the Quick Step.
Users can also create a ‘new message’ quickly using Quick Steps.
Using Quick Steps to Boost Productivity
Incorporating Quick Steps into your Outlook routine can significantly boost your productivity. By automating repetitive tasks, you free up time to focus on more critical activities. Quick Steps also help you stay organized by allowing you to categorize and prioritize your emails efficiently. For instance, you can create custom Quick Steps to respond to emails with pre-defined templates, ensuring consistent and timely replies. To maximize the benefits, start by identifying the repetitive tasks you perform most frequently and then create custom Quick Steps to automate those processes.
Example Quick Step: Delegating Emails
- On the Home ribbon, in the Quick Steps group, click on Create New.
Users can find the ‘quick step box’ in the Quick Steps group on the Home ribbon.
- Name your quick step.
Step One: Forward the Email
- Under Choose an Action, select Forward.
- In the To field, enter the email addresses of the recipients.
- Click on Show Options.
- Add cc or bcc addresses, change the subject, set a flag, or mark the importance. When you select the option to mark the importance, a dropdown box appears, allowing you to set the email importance easily.
- Add default text to the body of your email (if desired) using the Text field.
- To automatically send the email, check the box to Automatically send after a one-minute delay. If you do not check this box, the forward will open. You will have the opportunity to change the email recipients or text, but you must click send to forward the email.
Step Two: Mark the Email as Read
- To mark the original email as read, click on the Add Action button.
- Under Choose an Action, select Mark as Read.
Step Three: Apply the Client Category
- To apply the client category to the original email, click on the Add Action button.
- Under Choose an Action, select Categorize Message.
- Select the Category to be applied.
Step Four: Move the Email
- Finally, to move the original email to a specific folder, click on the Add Action button.
- Under Choose an Action, select Move to a Folder.
- Under Choose Folder, select the desired folder.
- Click Finish.
Learn more tricks like this in Affinity Consulting Group’s “Microsoft Outlook for Legal Professionals.”
Advanced Quick Step Features
Outlook offers several advanced features within Quick Steps that can elevate your email management. One notable feature is the ability to create custom Quick Steps using the “Create New” option in the Quick Steps box. This allows you to tailor a Quick Step to perform specific actions, such as forwarding an email to a colleague or creating a task. Additionally, you can assign a shortcut to a Quick Step, enabling you to execute the action with a single keystroke, thus saving even more time. Another useful feature is adding a tooltip to a Quick Step, which provides a brief description of its function, making it easier to remember what each Quick Step does.
Troubleshooting Quick Steps
If you encounter issues with your Quick Steps, there are several troubleshooting steps you can take. First, ensure that the Quick Step is enabled and visible in the Quick Steps box. If it’s not visible, try restarting Outlook or checking the Quick Steps settings. If the Quick Step is visible but not functioning correctly, review the actions associated with it to ensure they are set up properly. You can also try resetting the Quick Step to its default settings or deleting and recreating it. For additional help, consider searching for solutions in the Microsoft Community or contacting Microsoft support.
You Might Also Like
- “What’s New in Adobe Acrobat DC”
- “Five Easy Steps to Redact Sensitive Information in Adobe Acrobat Pro”
- “Tricks for Reading Microsoft Word Documents Aloud”
About Affinity Consulting Group
Affinity Consulting Group inspires, enables, and empowers legal teams of all sizes to work smarter, from anywhere. The company’s holistic approach incorporates people, process, and technology. Affinity’s passionate, well-connected industry experts work hand in hand with you to help you better understand and optimize your business — from software to growth strategy, and everything in between.
Illustration ©iStockPhoto.com
Subscribe to Attorney at Work
Get really good ideas every day for your law practice: Subscribe to the Daily Dispatch (it’s free). Follow us on Twitter @attnyatwork.