


Learn how to use compare documents in Word and you will know exactly what changes are made by reviewers.

Table of contents
Whether you’re sending a document to a client, opposing counsel or co-counsel for feedback, you need to know exactly what changes were made to your document. Even if you locked track changes before sending the file, it’s possible reviewers got around the lock and made some changes that weren’t tracked. To be certain, you need to know how to effectively redline in word using the built-in compare feature to create a clean legal backline.
Getting Started With Compare Documents
Get started on the Review tab. Click on the Compare button to access the compare function.

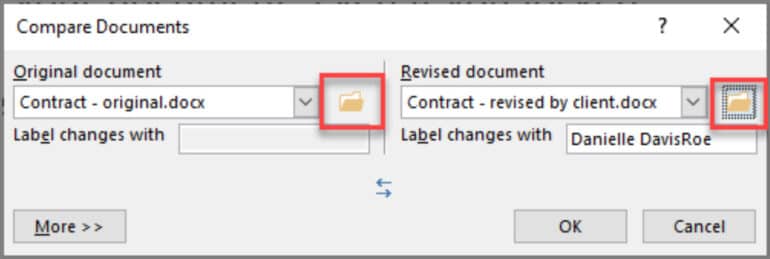
Click on the file folder icon on the original document side and select your original document. Then click on the file folder on the revised document side and select the revised document in the compare documents window.
Select the original and revised documents in the compare documents dialog box to initiate the comparison.
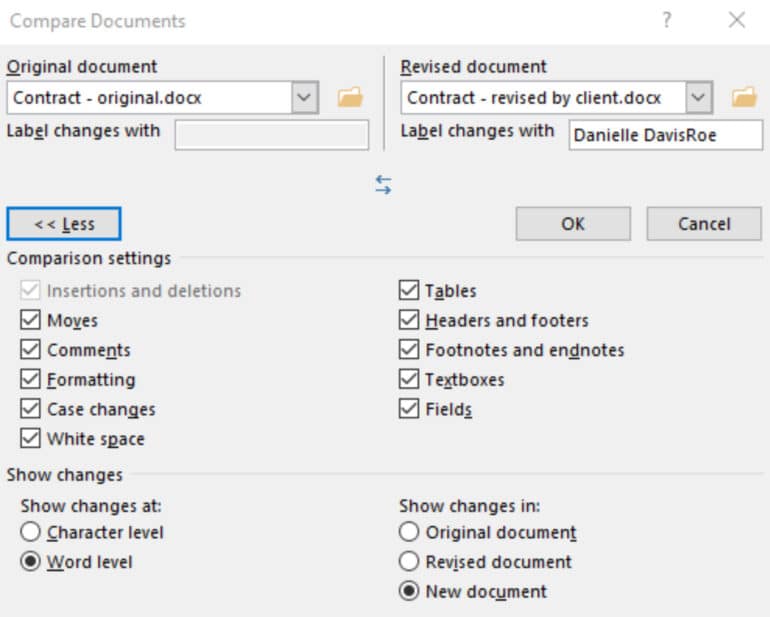
Don’t stop there. Click on the More >> button to uncover important settings.
Formatting
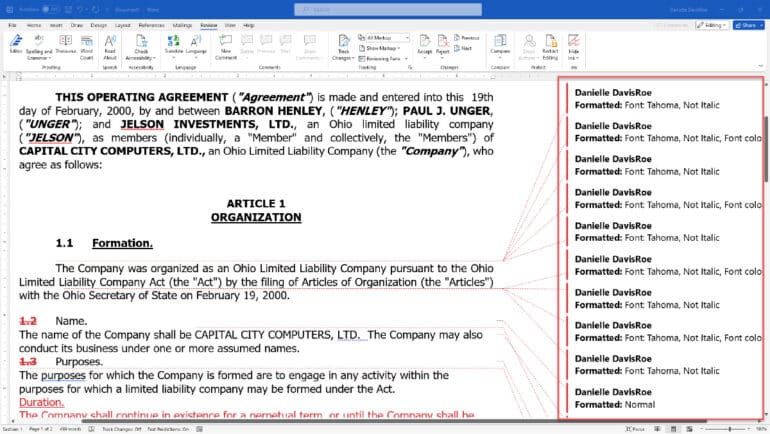
First, determine if you care about formatting changes. If not, uncheck the formatting box. If someone changes the font for the entire document, you’ll get a constant stream of “Author Name, Formatted: Font: Font Name” down the side of your screen when trying to read your redline in word.
Showing Changes at Character or Word Level
Next, decide if you want to show changes at the character or word level. For example, if the word “capital” was changed to “capitol” how would you want to see that?

Show Changes in the Revised Document
Finally, show the changes in a new document. Pro Tip: Save the resulting redlined copy as its own document to ensure you can easily go back to the original or revised copy at any time. Additionally, save the comparison document for future reference or sharing with others.
Get Control Over the Document Comparison View
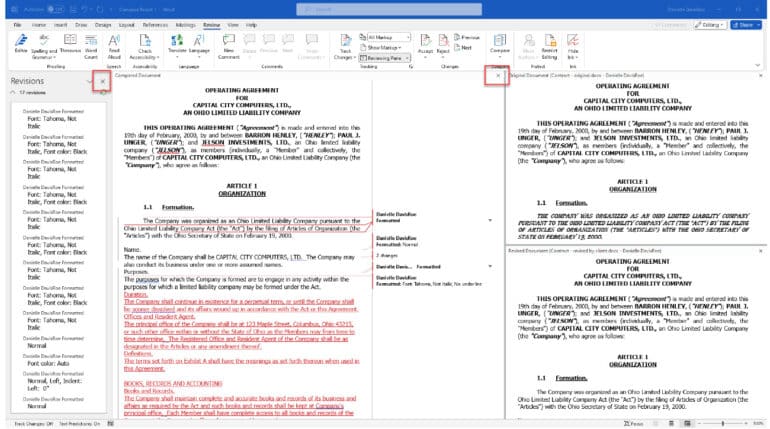
If you haven’t changed any settings, the resulting view can be overwhelming. Between the revisions pane, redlined document, original document, and revised document — there’s way too much on one screen for most people, especially when comparing two documents. Handling multiple documents in modern, multi-screen remote environments can further complicate the view, making it essential to manage the display effectively.
Click on the x in the upper right-hand corner of both the revisions pane and the redlined document to show just the redlined document. (It’s a little counterintuitive but clicking the x on the redlined document will close both the original document and the revised document.)
Accept and Reject Changes in the Review Tab
Saving a separate copy of your finalized redline in word is always a good idea, especially when comparing two fast-moving contract drafts. Then, you’ll need to decide which changes to accept and reject.
When you use Word’s built-in compare tool, all the redlines are treated as tracked changes. You can accept and reject each one individually or accept or reject them all, which is particularly useful when working with massive Word documents.
Use the changes group on the Review ribbon to navigate between changes and finalize your text. Click on the bottom half of the Accept or Reject button to accept or reject all changes at once if desired.

More Office 365 Training Manuals for Lawyers
Check out Affinity Consulting Group’s “Microsoft Word for Legal Professionals,” “Excel for Legal Professionals,” “Outlook for Legal Professionals” and “PowerPoint for Legal Professionals.” Each manual zeros in on your practice’s needs with in-depth instructions from Affinity experts on getting the most out of your tech.
Frequently Asked Questions
The global keyboard shortcut to toggle Track Changes on or off is Ctrl + Shift + E for Windows and Cmd + Shift + E for Mac.
Navigate to the Review tab, look for the Changes group, click the downward arrow directly below the Accept button, and select Accept All Changes.
Simple Markup displays the final version of the text with a clean red indicator line in the left margin where changes exist. All Markup shows the classic legal backline view, detailing every insertion (underlined) and deletion (struck through) inline.
About Affinity Consulting Group
Affinity Consulting Group inspires, enables and empowers legal teams of all sizes to work smarter, from anywhere. The company’s holistic approach incorporates people, process and technology. Affinity’s passionate, well-connected industry experts work hand in hand with you to help you better understand and optimize your business — from software to growth strategy, and everything in between.