


Microsoft Word tips for lawyers who spend time editing, formatting and tweaking long documents.

Table of contents
- Microsoft Word Tips for Lawyers
- First Up: Word’s Navigation Pane
- Speaking of Word Styles, Our Second Tip …
- My Third Tip: Get ‘Zoomy’ With It
- Take a Few Clicks to Make Word Work for Your Law Practice
- About Affinity Consulting Group
- More Microsoft Word Tips for Lawyers
- Office 365 Training Manuals for Lawyers
Microsoft Word Tips for Lawyers
These days in legal tech, it’s hard to get a word in (pun intended), unless it’s about AI. But the fact is, you’re probably still spending a lot of time every day in the tried-and-trusted tools you’ve been using for years. Especially Microsoft Word. Let me give you three quick tips to help make Word work better for you, especially on long documents.
First Up: Word’s Navigation Pane
If you’ve got a big document, getting from place to place in that document can be a challenge. The Navigation Pane is your solution. You’ll find it on the View tab of the ribbon.
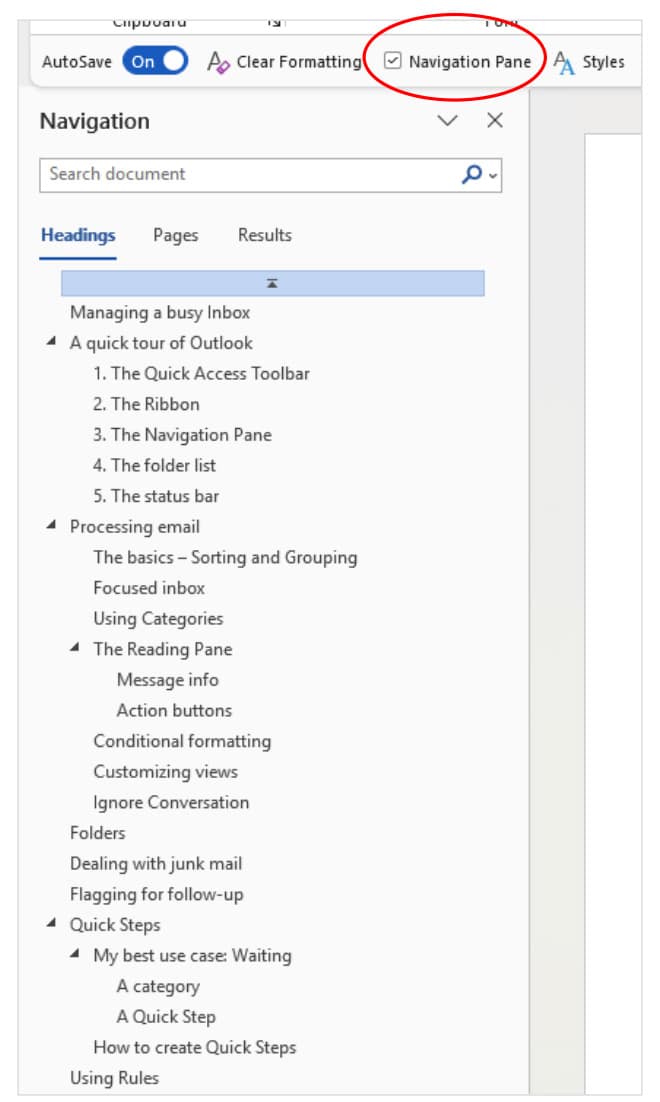
When you turn it on, a panel will open on the left side of your document showing you a dynamic table of contents for the document. You can click on any heading in the list, and Word will immediately take you to that part of the document. That’s pretty nice.
An unexpected bonus: You can also reorganize your document with the Navigation Pane. Want Section 4 to move above Section 3? Just drag and drop it in the Navigation Pane, and the entire section — text and all — will move to the new location.
Also, if you used automatic numbering, the document will immediately renumber itself to reflect its new order. Awesome.
Also to note: At the top of the Navigation Pane, you’ll find a search box that lets you find (and navigate to) any word or phrase in the document.
I use the Navigation Pane so often that I added it to my Quick Access Toolbar so I can quickly turn it on in any document.
Is your Navigation Pane empty?
That’s probably because you didn’t use Microsoft’s Styles to format your document’s headings. Word builds the Navigation Pane with Heading styles. If you just formatted your headings with direct formatting … well, now you have another reason to do it properly using styles.
Speaking of Word Styles, Our Second Tip …
The Styles Gallery is on the Word ribbon because that’s how Microsoft thinks you’ll work with styles. But there’s a much better way. At the bottom right corner of the Styles Gallery, there’s an almost imperceptible button that most people never notice. Microsoft calls those little buttons “Dialog Launchers.”
When you click the launcher in the Styles Gallery, something almost magical happens.

A Styles pane opens that gives you immediate access to your styles in a much easier way. By default, the pane is floating over your document, and you can drag it or resize it as you like.

I recommend dragging the pane over to the right side of the Word window. Then you’ll find that when you get close to the edge, it will automatically “snap” to the side of the window.
Now you can quickly apply or change styles in your document with just a flick of your mouse. And, you can quickly see which style is applied to the text you’re working on right now (it’s the one in the rectangle).
Bonus tip: Find the checkbox near the bottom of the Styles pane that says “Show Preview.” Check it, and the Style names will be formatted with the same settings as the style itself. Not only is that nicer to look at, but it gives you a clearer idea of how the text should look after you apply a given style.
If you want to do more advanced things with Styles, like manage which ones appear or save custom styles to your Normal template, buttons at the bottom of the Styles pane let you quickly do so.
My Third Tip: Get ‘Zoomy’ With It
Do you know you don’t have to squint at Word on your 36-inch monitor? The View tab has zoom controls that let you fit the text to whatever size you find most comfortable. So does the status bar at the bottom of the window, for that matter.
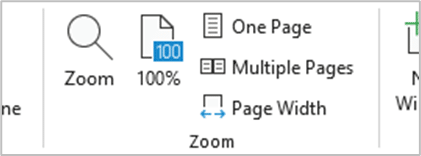
In fact, when I use Word, I have my ribbon collapsed, the Navigation pane (see Tip No. 1) and Styles pane (see Tip No. 2) turned on, and my zoom level set to “Page Width.” That zooms the text in so that it perfectly fits the screen between the two powerful panes on the sides. It’s 20% to 45% larger, comfortable to read, and pleasant to work with.
Take a Few Clicks to Make Word Work for Your Law Practice
You can do a lot to customize how Word looks and feels. You can change things about the layout, turn off things you don’t use and even change the colors. Don’t resign yourself to living with the default experience when, with just a few clicks, you can make it a much more powerful and enjoyable tool.
About Affinity Consulting Group
Affinity Consulting Group inspires, enables and empowers legal teams of all sizes to work smarter, from anywhere. The company’s holistic approach incorporates people, process and technology. Affinity’s passionate, well-connected industry experts work hand in hand with you to help you better understand and optimize your business — from software to growth strategy, and everything in between.
More Microsoft Word Tips for Lawyers
- Build Your Own Copilot Legal Assistant — No Tech Skills Required
- Microsoft Bookings for Lawyers: Make a Date With Personal Booking Pages
- 6 Ways Microsoft Word Speech-to-Text AI Can Help You Write Faster and Better
- Templates to Create Model Documents That Save Your Law Firm Tons of Time
- How to Master Page Numbers in MS Word
- 6 Ways Microsoft Word Speech-to-Text AI Can Help You Write Faster and Better
- Using Microsoft Word Templates to Create Model Documents That Save Your Law Firm Tons of Time
- How to Master Paragraph Numbering in Word for Multilevel Lists on Mac
- How to Use Microsoft Word Section Breaks to Change Margins, Page Orientation and More in the Middle of a Document
- Take Your Practice to the Next Level With Document Automation Tools
- How to Master Page Numbers in MS Word
- 10 Easy Ways for Setting Word to Make Microsoft Word Less Annoying
Office 365 Training Manuals for Lawyers
Check out Affinity Consulting Group’s “Excel for Legal Professionals,” “Outlook for Legal Professionals” and “PowerPoint for Legal Professionals.” Each manual zeros in on your practice’s needs with in-depth instructions from Affinity experts on getting the most out of your tech.
Featured Photo by Christina @ wocintechchat.com M on Unsplash.